
Last Updated: October 30, 2026
Quick Summary
Common flat roof installation mistakes include skipping a written checklist, ignoring drainage and ponding, poor flashing and seam work, and using materials or systems the crew is not trained for. Most flat roof installation failures are built in during the job and hidden under a clean-looking membrane, so verify seams, drains, and penetrations before the crew leaves.
- Flat roof drainage problems cause more callbacks than any other single issue.
- Walk the roof after insulation is set but before the membrane goes down to check for depressions.
- EPDM seams are glued, not welded, so surface cleanliness and roller pressure decide whether they hold.
- Every TPO seam should be probed and pull-tested, not spot-checked.
- Mixing components from different systems is one of the fastest ways to void a warranty.
Table of Contents
- Why Flat Roof Installation Goes Wrong So Often
- Mistake 1: Skipping the Flat Roof Installation Checklist
- Mistake 2: Ignoring Flat Roof Drainage Problems
- Mistake 3: Poor Flashing and Membrane Work at Penetrations
- Mistake 4: Flat Roof Seam Failure From Bad Welding and Lap Work
- Mistake 5: Using Unsuitable or Aging Roofing Materials
- Signs of Improper Roof Installation to Watch For
- Mistake 6: Ignoring Code, Manufacturer Specs, and Warranty Terms
- Frequently Asked Questions
Why Flat Roof Installation Goes Wrong So Often
Many flat roof failures are not caused by bad weather alone. Installation mistakes often cause them. That is the uncomfortable truth about common flat roof installation mistakes: the damage is usually built in, then hidden under a clean-looking membrane. This guide walks through common flat roof installation mistakes, how to spot them, and how to prevent each one.
Flat roof installation is the process of laying a low-slope roofing system, including the deck, insulation, membrane, flashing, and drainage, so water sheds reliably for decades. It fails when any one of those layers is rushed. The NRCA roofing guidance makes the same point: watertightness depends on the whole assembly, not just the sheet on top.
Mistake 1: Skipping the Flat Roof Installation Checklist
A common mistake is starting without a written plan, since crews that skip a checklist tend to miss the same items. A flat roof installation checklist keeps the job honest.
What Belongs on the Pre-Installation Checklist
- Confirm the deck is sound, dry, and fastened to spec
- Verify roof slope and drain locations
- Check that materials match the manufacturer’s approved system
- Confirm flashing details for every penetration
- Stage materials so they are not dragged across the new membrane
What to Verify Before the Crew Leaves
Walk the roof before the crew packs up. Check seams, edge metal, drain clamping rings, and terminations. Photograph every penetration. A missing checklist item today becomes a leak next spring.
Mistake 2: Ignoring Flat Roof Drainage Problems
Flat roof drainage problems cause more callbacks than any other single issue. Water that cannot leave the roof will find a way in. The mistake is treating drainage as an afterthought bolted on at the end of the job instead of a design decision made before the first insulation board is laid.
Slope, Ponding, and Standing Water Thresholds
Low-slope roofs need positive slope toward drains across the whole roof field, and manufacturer requirements and local codes should be checked for the specific slope minimums. A roof that is dead flat, or that has low spots between drains, will hold water no matter how good the membrane is.
Standing water is the tell. Water that remains on the roof well after rain has stopped is ponding and should be addressed rather than treated as cosmetic. Ponding adds weight, stresses seams, and accelerates membrane deterioration. It also gives debris and biological growth a place to take hold.
Design Details That Prevent Ponding
- Tapered insulation: Building slope into the insulation package helps water flow to drains instead of relying on the structural deck.
- Drain placement and count: Size and locate drains so water reaches an outlet across the roof. Overflow scuppers or secondary drains help if a primary drain clogs.
- Drain clamping rings and strainers: A drain without a proper clamping ring and strainer is a leak waiting to happen. Verify the ring compresses the membrane and the strainer keeps debris out.
- Crickets and saddles: At curbs, penthouses, and long valleys, add crickets so water does not stall against a vertical surface.
What to Check During Installation
Walk the roof after the insulation is set but before the membrane goes down. Look for shallow depressions that can hold water, and confirm drain elevations sit at the low point. Photographing the slope and drain layout helps document the work.
A roof that drains well on a dry day can still pond after a heavy rain if the drains are undersized or partially blocked. Confirm overflow capacity, not just primary drainage.
Mistake 3: Poor Flashing and Membrane Work at Penetrations
Flashing is a common source of leaks. Faulty flashing around vents, curbs, and skylights can let water behind the membrane, so penetrations need proper curbs, sealed membrane boots, and terminations that shed water away from the joint.
Mistake 4: Flat Roof Seam Failure From Bad Welding and Lap Work
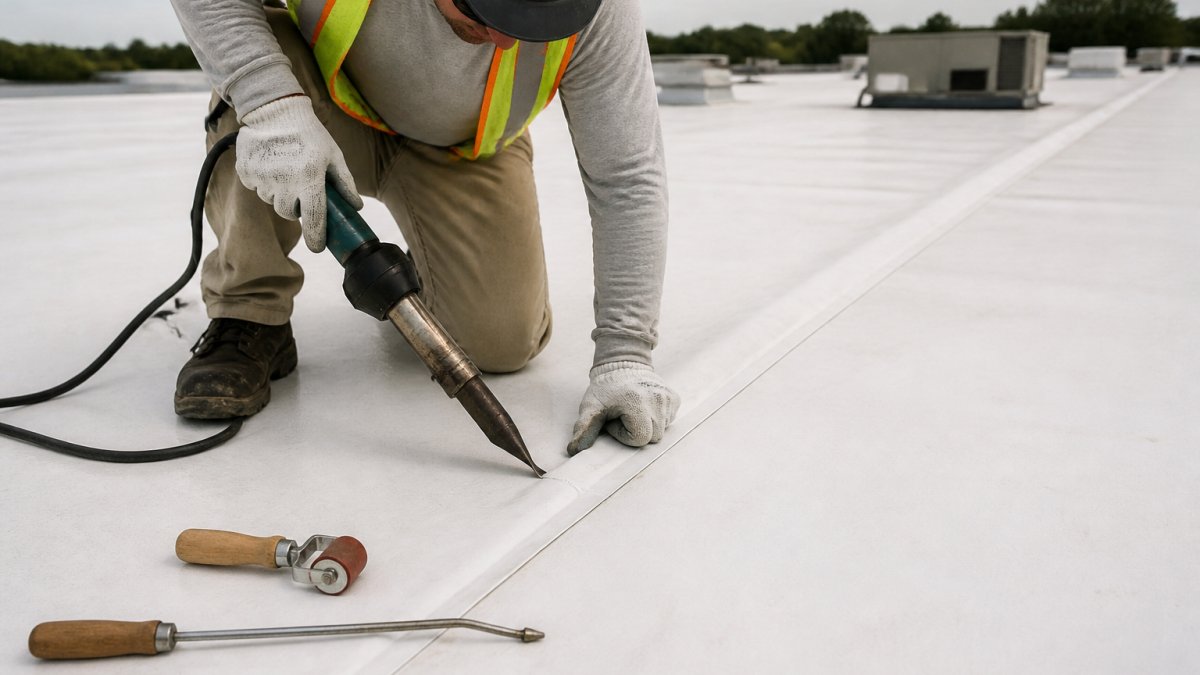
Seam failures can come from bad laps, dirty surfaces, or uneven heat. Proper lap width, a clean membrane, and a tested weld help seams hold.
Mistake 5: Using Unsuitable or Aging Roofing Materials
Not every membrane suits every building, and the installation mistakes that matter most depend on which membrane is going down. A crew trained on one system will make predictable errors on another. The material choice and the installation method should match.
Material-Specific Installation Mistakes
- EPDM (rubber): The classic error is using the wrong adhesive or primer, or failing to splice seams with the correct seam tape and pressure roller. EPDM seams are glued, not welded, so surface cleanliness and roller pressure decide whether the seam holds. Solvent-based adhesives also need proper cure time and ventilation.
- TPO: Heat-welded seams fail when the welder runs too hot, too cold, or too fast. The membrane must be clean and dry, and every seam should be probed and pull-tested, not spot-checked. TPO is also sensitive to plasticizer migration and incompatible sealants at terminations.
- PVC: Similar heat-welding discipline applies, but PVC reacts badly to incompatible bitumen and some sealants. Using the wrong flashing cement or contact adhesive at a penetration is a common shortcut that shows up as a failed detail later.
- Modified bitumen: Torch-applied and self-adhered systems each have their own failure modes. Torch work overheats or underheats the sheet, and laps that are not properly rolled trap air. Self-adhered sheets need a clean, primed substrate and adequate pressure.
- Built-up roofing (BUR): Ply count, mopping rates, and interply time matter. Too little asphalt between plies, or plies laid when the bitumen has cooled, creates voids that lead to blisters and splits.
Matching the Material to the Building
Roof exposure, foot traffic, snow load, and chemical exposure all affect the choice. A membrane that is fine on a shaded warehouse may fail on a roof with heavy HVAC traffic or ponding water. Aging materials fail sooner, and installing a new membrane over a saturated or deteriorated substrate is a mistake no material can overcome. Readers weighing a new roof can review commercial flat roof replacement cost expectations.
Specs, Warranties, and Compatibility
Manufacturers approve specific systems, membrane, adhesive, flashing, and fastener combinations. Mixing components from different systems is one of the fastest ways to void a warranty. Read the manufacturer’s published installation instructions and the warranty terms before work starts, not after a leak. For pricing, please contact United Roofing of Colorado for a current quote, as costs depend on project scope and conditions.
The right question is not “which membrane is best” but “which approved system fits this roof, and is the crew trained to install that system correctly.”
Each membrane fails in its own predictable way, so the crew’s habits have to match the material going down.
| Material | Common installation mistake | What matters |
|---|---|---|
| EPDM (rubber) | Wrong adhesive or primer; seams not spliced with correct tape and roller | Glued seams depend on surface cleanliness and roller pressure |
| TPO | Welder runs too hot, too cold, or too fast | Clean, dry membrane; every seam probed and pull-tested |
| PVC | Wrong flashing cement or contact adhesive at a penetration | Reacts badly to incompatible bitumen and some sealants |
| Modified bitumen | Torch work overheats or underheats; laps not rolled trap air | Self-adhered sheets need clean, primed substrate and pressure |
| Built-up roofing (BUR) | Too little asphalt between plies; plies laid after bitumen cooled | Ply count, mopping rates, and interply time matter |
Signs of Improper Roof Installation to Watch For
Look for these warning signs of improper roof installation:
- Bubbles, blisters, or wrinkles in the membrane
- Open or lifting seams
- Rusted or loose fasteners
- Water stains on ceilings after rain
- Sagging roofline or soft spots
- Debris trapped under the membrane
If you spot these, act early. Readers who suspect installation damage can follow a guide to flat roof repair. Readers can find professional flat roofing services to correct installation problems. For professional help with flat roofing, contact United Roofing of Colorado for a free roofing estimate. For the root causes behind leaks, see why flat roofs leak.
Mistake 6: Ignoring Code, Manufacturer Specs, and Warranty Terms
Skipping code and manufacturer specs can affect warranty coverage and increase the risk of failure. Read the warranty terms before work starts, not after a leak. Our guide to roofing warranty coverage explains how coverage actually works.
Flat roof problems rarely announce themselves until water is already inside. The fix starts with a crew that follows the checklist, respects the specs, and stands behind the work. United Roofing of Colorado is a locally owned and operated business and certified Duro-Last installer, established in 2014, with over 30 years of combined industry experience. Get started with United Roofing of Colorado and request your free roofing estimate today.
Frequently Asked Questions
What are the most common flat roof installation mistakes?
The repeat offenders are poor drainage design that leaves standing water, badly welded or lapped seams, flashing installed without proper termination, and membranes laid over a wet or dirty deck. Crews also skip the flat roof installation checklist, use aging or unsuitable materials, and ignore manufacturer specs that warranty coverage depends on. Most of these problems stay hidden until the first heavy rain or snowmelt, which is why a post-installation inspection matters as much as the work itself.
How can I tell if my flat roof was installed correctly?
Look for uniform membrane surface with no wrinkles, blisters, or fishmouths along the edges. Check that seams are straight, fully bonded, and probed during installation. Water should drain toward scuppers and drains with no low spots holding standing water 48 hours after rain. Flashing at walls, curbs, and penetrations should be mechanically fastened and sealed, not just caulked. Ask for photos of the deck before the membrane went down, plus the manufacturer’s warranty paperwork naming you as the owner.
How can poor drainage cause flat roof leaks?
Flat roofs rely on slope, not gravity alone, to move water to drains. When the deck has low spots or drains sit higher than the surrounding surface, water ponds and sits for days. Standing water breaks down membrane surfaces, works into seams, and adds weight that stresses fasteners. Over time it also feeds biological growth and freeze-thaw damage in cold climates. Correcting slope and drain height during installation can prevent costlier repairs to saturated insulation and decking later.
When should a flat roof installation problem be inspected by a professional?
Call a professional when you see sagging rooflines, water stains on ceilings, blisters or splits wider than a hairline, or standing water that lingers after rain. Seam failure, loose flashing, and soft spots underfoot also warrant an inspection, since these often point to moisture already inside the assembly. A certified installer can probe seams, check drain heights, and confirm whether the issue is a repair or a replacement before damage spreads to the deck.
